Showing posts with label Twister. Show all posts

Friday, January 25, 2013

Twisted Fandango

I have my first finished quilt for 2013 and it feels good to have a finish under my belt.  I set some pretty lofty goals last year of making 12 quilts in 2012 and then life got in the way and I only managed to finish up 5 quilts.  So having a finish this early in the year has me doing a little jig.

I started Twisted Fandango way back in February 2011.  Wow that's even longer than I thought.  You can read earlier post about the quilt here, here, here, and here.  After I got the main part of the quilt together I really stalled with the borders.  I couldn't make the little pin wheels work out the way I wanted them to look and then nothing seemed to fit just right.  Then when one of my good friends announced she was moving I really wanted to send her off with a quilt.  I knew I didn't have time to start something from scratch and I knew she would like the colors in the Twisted Fandango quilt so out of the closet it came.  Needless to say she moved a while ago and I didn't get this quilt done in time to give it to her.  I am debating sending it to her now but there are a lot of things about this quilt I'm just not sure about now.


I started this quilt when I was a fairly new quilter.  I was still learning.  I rarely used more than one fabric line in a quilt unless I was going for a scrappy quilt.  So while I think this quilt is pretty and I love the fabric line as much now as I did back then there are some things I would do differently if I was making this quilt today.  I'm not a huge fan of the white in this quilt.  I'm pretty sure its just your basic Kona White although it feels a little stiff so I'm not sure now that it's actually Kona.  I'm thinking it might be the Joanne's brand of Kona.  Same name much different quality of fabric.  I'm also not a huge fan of the borders.  I thought when I was making them that adding in some of the charm squares I had left would give it a little something but now it just looks like an afterthought to me.  It's also a little small to me, I think it measures roughly 65 by 65.  I like my quilts to be nice and big for snuggling on the couch.  They have to be able to cover my shoulders and toes at the same time.  This one is a little small for that.  What do you think, is that a deal breaker?  I know not everyone likes blankets to cover that much and that some people prefer lap blankets that just cover their lap and feet.

The back, oh the back of this quilt is perhaps my favorite part of the whole quilt.  I love the little line of baby twisters marching down the back off centered.  And the fabric that makes up the rest of the back and the binding is one of my favorites from this line.


 I know my friend and I know she would appreciate the thought and love that goes into every quilt and that she would love this little quilt despite what I see as flaws.  So tell me, what do you think?  I know that sometimes I am my own worse critic.  Quilting is like everything else, the more you make the more you learn and the more you improve.  So would you share a quilt with someone you love despite its flaws or would you start over?  And if you start over with your skill set being what it is now in 5 years will you regret giving a quilt you made 5 years ago?

And since I finally have a finish to show on a Friday I am linking up with Amanda's Finish It Up Friday.  I have no crazy thoughts that I will have a finish every Friday but this is a start.


Wednesday, March 23, 2011

Twisted Fandango Part 4

I finally am getting around to trying to finish this quilt. This will probably be the last peak I will show of this quilt before it's finished. For the boarders I really wanted to make smaller pinwheels that looked like they were floating. Once I figured out how to do the boarders I just picked random amounts of pinwheels that I wanted to have interlocked. I wasn't expecting the voids to actually look like pinwheels themselves. But it turns out the end product works. I don't usually like square quilts but I'm pretty fond of this little ditty so far. I have a plan in my mind for how I want to quilt this one. Now I just need to finish a couple more boarders and it will be all good to go.

This quilt has come together really easily and it was pretty simple to make.  I just used a layer cake, charm pack, and some yardage of Kona Snow.  You will need the lil' twister as well as the larger twister to make one but I see lots of potential uses for both.  In fact I have an idea for another quilt floating around in my head right now that was inspired by the boarders and 4 charm packs that I recently picked up.

Wednesday, March 2, 2011

Twisted Fandango Part 3

I am really surprised at how quickly this quilt is coming together.  The top has all been re cut and sewn back together again.  Now unfortunately I have to put it away while I await some additional fabric that I ordered so I can finish it up.  The whole process so far has been super quick and easy.


If you are planning on making a quilt like this I do have a few tips though.  Line up all of your seems.  I know that sewing precuts together is suppose to make life easy but they do sometimes have a slight variance.  The more exact your corners are when you sew together the original layout the better your finished pinwheels will look.  We already talked about the continuous boarder but again I would recommend it.  As I was sewing the rest of my blocks together I ended up with one small piece that was less than and inch big.  It's no big deal really but I don't like unnecessary seams.  Also remember that once you turn and cut the fabric you are working with the bias.  It stretches really easily so you have to be careful not to pull on the pieces and stretch them.  And my last bit of advice would be to press.  After moving the top around so much to re cut the blocks they really needed a good pressing as I went to ensure that they were cut properly.

But there you have it, my almost finished twisted fandango quilt.  I must have really found my sewing spark because I didn't sit and sew for hours on end but I was able to sew this quilt up less the boarders in just a few days.  Now I am looking forward to starting on my Swell quilt while I wait on the fabric for the boarders of twisted fandango.  Still not really digging that name, any ideas?

Tuesday, March 1, 2011

Twisted Fandango Part 2

I went and got some Kona Snow today so I could work on the next part of my twisted fandango quilt tonight.  Not sold on the name so please suggestions welcome.  Once the layer cake squares are sew together the directions call for adding a six and a half inch boarder all the way around.  At this point the quilt will look something like this.  Again I could have been happy stopping here and having a very simple pretty quilt.

A few things I learned at this point.  The instructions included with the ruler/template only called for a 1 1/4 yards for the borders and suggested cutting by length of fabric.  If I were doing this step again I would have just bought a bit more yardage and cut one continuous piece for the boarders.  It isn't really a big deal but I'll show you later why I make that suggestion.

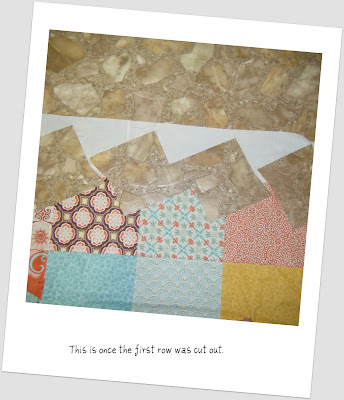
One of my big concerns about this project was the amount of fabric that would be wasted.  Here is a picture of what mine looked like with the first set of blocks cut out.  Really not to bad, once the second row was cut out I had about a 4 by 5 inch pieces left from the middle.  I don't think this is to much waste because that size scrap is big enough to use in a lot of different projects.  I plan to use mine in my borders but they would be a welcome addition to the scrap bin as well.


Here are my first two rows sewn together.  As you can see it does shrink a lot from the previous arrangement but I think it will be a nice size throw quilt to cuddle under.  Look for more updates on the progress of this one as I move along I'll be sure to share.

Monday, February 28, 2011

Twisted Fandago

I was reading today about how some of these super crafty seemingly super hero women get so much done in a day and one of them mentioned that they schedule there blog post the night before.  This is going to be my first attempt at typing up a blog post and setting the auto scheduler.  Sometimes I just don't have the motivation during the work week to sew and blog so I am hoping this might help me out a little with updating more often.

So after I finished the baby quilt, I wanted some pretty easy sewing.  I have been avoiding my machine for a while, no I don't really know why it just seemed like the thing to do.  But remember that ruler I showed you that my mom and I picked up at the quilt show?  It is called "Twister" and it's from Country Schoolhouse.  We opted for the larger ruler which is meant to be used with a layer cake.  I didn't buy the book so I was a little concerned about how things would turn out but as it is there are very basic instructions included with the ruler for a 61" by 61" quilt.  See you sew the squares together very basic like in a 6 by 6 design.  I had to stop there because I didn't have the solid yardage I needed to add the boarder.  I suppose you could stop here and just have a very nice easy quilt top with large squares to feature some of your favorite fabrics.


In this case however, you use the twister template to make a fun pinwheel design.  Well you already know how much I like pinwheels.  It seems to me like there is going to be a lot of fabric waste.  I wanted to capture the whole process on this one, something I hardly ever do.  I am using a Fandango layer cake and I think it looks just lovely in it's current state but I'm excited to see how the pinwheels turn out as well.  Right now I am planning to use white for the boarder around the squares which will actually become part of some of the pinwheels and then a blue or coral color for the outer boarder.  I'm not really sure but I'm actually just thinking about ordering yardage of one of my favorite prints for the outer boarder. Although depending on how much waste there actually is I might be able to make a scrappy boarder.  I think on this one I really am going to just take it one step at a time instead of trying to plan it all out.  Besides isn't that really more fun anyway.