Thursday, February 28, 2013

Setting Seams (A Tutorial)

My SIL just started sewing this past Christmas by making some emblished dish towels, pot holders, and an table runner for her sister.  She is now knee deep in her first quilt and it appears to be going great.  I tell you that to tell you this.  When I first started sewing I had a ton of problems getting my seams to lay flat.  No matter how much I pressed and pressed there always seemed to be a little fold in the fabric right at my seams that just wouldn't fold flat.  One day as I was sewing with my mom she showed me that I was suppose to set the seams first.  I had no idea what she meant but she taught me what she had learned in a class when she first started quilting.  I assumed that everyone did this until a friend asked me once how I got my seams so nice and flat and showed me that annoying fold of fabric on her quilt seams.  I took some photos (sorry they aren't the best) and thought I would share what I do here just in case there is the off chance that some of you still don't know about setting your seams.


Keep in mind I press my seams to one side so if you press your seams open you probably don't have this problem.  To start you will want to sew your seam just like normal.  Then lay your piece on your pressing surface.  The side you are pressing your seam to will be facing up.


Then you are going to press the seam.  Be sure to press DO NOT use the back and forth motion you use for ironing clothes as this can stretch and warp your fabrics.  I use a dry warm iron when I press my seams.  When I first started quilting I used steam like it was my best friend.  I later found that this too can cause your fabrics to warp and become distorted.  I know some people still prefer steam-I do when ironing my fabrics prior to cutting just be careful if you chose to use steam.


Now open your fabrics and press in the direction you want your seam to go.  This should leave you with a super flat, super crisp seam.


Please don't judge my ugly ironing board cover.  I really do have every intention of making a new one someday.  It's just one of those projects I haven't found time to get to yet.  And I'm sorry the photos are a little blurry I took them on my iphone a while back to help out a friend.

Wednesday, February 27, 2013

WIP Wednesday

Even my trimming bin is happy with these colors.

I can't believe that it is already Wednesday again.  It feels like the week is passing by so quickly and so slowly all at the same time.  I haven't really made a ton of progress in the sewing front this week.  I managed to make a little progress on Complications Quilt.  That's what I'm calling it for now-it needs a better name but well this quilt has proven to be very complicated to me so I am going to refer to it as that until I come up with something better.


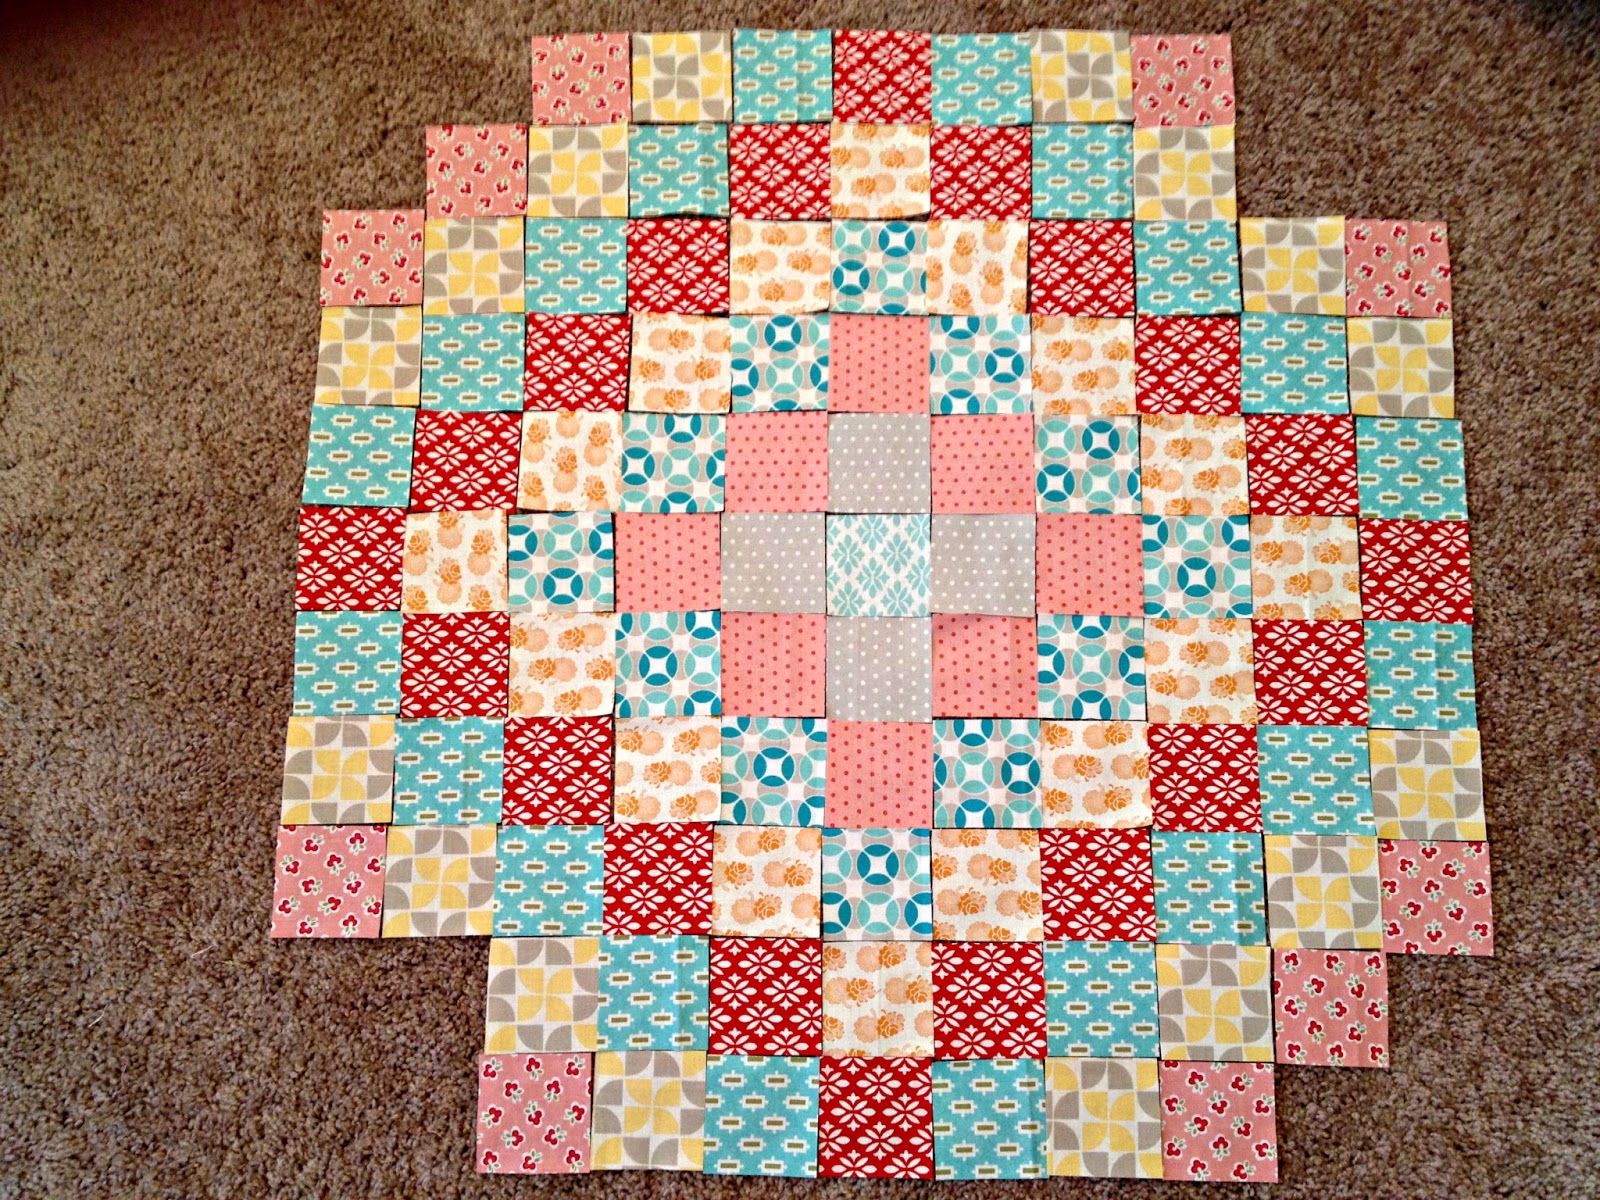
I had been working with the assumption that I would make all the blocks first and then start trying to assemble the puzzle pieces together.  I of course got ahead of myself though and decided to put together the first chunk of the puzzle.  It has grown a little since I snapped this picture but I am really glad I decided to start putting it together because it really helped me see that while I thought I was dispersing the colors pretty evenly I had large sections that didn't have as much contrast as I had hoped for so I was able to make some corrections.


My other project this week was to update the look of my blog a little.  When I first started blogging I was lucky enough to win a blog header in a give away.  I used a basic blogger template and called it done.  I eventually changed my background to a template from a free site and thought it looked okay.  Occasionally I have updated that template like now to give it a fresh look.  Just recently though I figured out that I could add to the header templates and all through a site like picmonkey.  So I took a basic header template that matched my background over to picmonkey and added in some more elements and then I got this.


I have to admit I am pretty proud of myself for figuring it out.  I'm not the most technology savvy person out there so little things like this are a big deal to me.  Although I am learning more and more and there are some great tutorials floating around out there.  Oh and see my pretty comments button up there, I made that too with some free clip art and the addition of a little text.

Be sure to head over to Lee's and see what everyone else is up to this week.

Tuesday, February 26, 2013

Confessions of a Noncommenter


I am horrible at comment love!  There I made my confession.  I don't know what it is that makes it so hard to leave comments on the blogs I love.  I guess part of it is my own insecurities that I don't always feel like I can add to the conversation, or that I don't know what I would say other than that the bloggers newest project looks pretty or I like the fabrics.  Sometimes I am so amazed at the skill level that I'm just in awe.  So then why don't I say that?

I never really thought much about comments until lately.  When I first started blogging I did it as a way to share my bee blocks and swaps.  Then after a couple of bad experiences I stopped participating in bees and swaps for a while and my blog just became a place to share my own projects.  That was great and I knew everyone who was reading on a regular basis because they commented regularly and because my base of readers was so small.


I don't have a ton of followers here which is okay because I'm happy just to share what I make and talk freely about what's going on in my little corner of the quilt world.  I don't check my stats page very often but every once in a while I will pop over there just to see what post are getting the most traction so I know what my readers are enjoying hearing about.  I don't want to bore you guys with a bunch of stories that you don't care to read.  Most of the time my WIP Wednesday post have the most views which is no surprise to me because it's a linky party after all and half the fun is popping by the other blogs to see what everyone else is working on.


Friday I linked up with Amanda Jean the second time for Finish it up Friday and all of the sudden I had a ton of page views.  It was totally unexpected to me but I guess it shouldn't really be a surprise because her blog is so popular.  What I did find interesting was that for all of those visitors very few left comments.  I don't want to sound like I'm complaining because that isn't my intention at all.  I just know that I'm not great about leaving comments so it got me thinking.  What is it that gets you to take that extra moment to comment?  Do you think wow that looks cool and then move on to the next blog in your reader?  I know that at home I have that nifty next button that leads me read through my reader on the actual blog page but when I catch up on some blogs during my lunch hour I read them through google reader and honestly sometimes I'm just lazy most of the time and don't take that extra minute to click through to the blog and comment.


 So now I am making a commitment to myself and to all of you that I am going to make it a priority to leave a little comment love for the bloggers I enjoy reading.  I hope you will take a moment out of your day to do the same even if it's not here on my blog because after all you never know when you might give someone that extra spark they need to keep sharing.

Monday, February 25, 2013

Puzzle Piece One

I made some progress on my latest quilt top this weekend.  While everyone was at Quiltcon the online universe was pretty quiet so the time I usually spend stalking flickr and my google reader being overwhelmed with inspiration was spent in quality sewing time instead.

Sorry for the poor photo.  I snapped it on my iphone
because I haven't been able to find my
camera since the move.

I mentioned before that the instructions for this quilt are all in German and while google translate does provide some help it is far from perfect.  So I spend a lot of time just looking at the pictures and then just winging it.  So far this method has worked okay for me for the most part.  I did choose at the start of this project not to sew all of the blocks together to avoid those partial seams which I am now pretty proud of myself for doing.  Because of that I was able to put together the first segment of the quilt top last night.  It might not look like much yet but I am already in love with this quilt top.  It's been a long time since I worked on something without sashing between the blocks so I really love how these different blocks just sort of melt into each other.  It's a lot of fun but I know I still have a long way to go.


Finally this block doesn't allow me to avoid those partial seams altogether so I am doing the best I can with it.  I was able to get to this far and then well I sewed it together and took it apart what seems like 100 times. I know I am suppose to sew those two little triangles on next but I'm not sure where I should be sewing them.  If anyone has any advice I'd love to hear it.

Friday, February 22, 2013

I'm A Hoot For You


I'm so excited to have a finished project again in time for Finish it up Friday.  When my aunt asked me to make a quilt for my cousin I have to admit I freaked out a little bit.  I was excited to do it and the opportunity came at a moment when I needed a good confidence boost but at the same time I was scared to death to think someone would actually be paying me to make a quilt.  What if it isn't good enough, what if she sees something completely different than I do, what if, what if.  That was what was going through my head.  Then I sent her some pattern ideas and fabric ideas and she told me a little about what she liked.  I asked more questions and my aunt just told me not to worry about it and to just go for it that I was the quilter and she trusted me.  Talk about pressure.  In the end I made this sweet little quilt and I really hope that both my aunt and my cousin will love it as much as I do.

I typically quilt my own baby quilts but this time I chose to have it quilted on the long arm.  I had no idea how I was going to have it done but I was thinking some sweet flowers, after all it is a little girls quilt.  When I went in to pick out the quilting pattern Ellen (my long arm quilter) had the perfect design.  It is owls and flowers.  How sweet!  Here is a close up of one of the owls.  It is a little hard to see them in the patchwork part of the quilt but she did a great job lining it up so there are three owls across the top boarder that appear to be peaking out of the patchwork.


I think it's a little easier to see in this black and white photo

So what did you finish this week?  Head over to Amanda Jean's to see what everyone else is up to.

Wednesday, February 20, 2013

WIP Wednesday

I haven't had a chance to do a whole lot of sewing since this weekend but I did make a little more progress on my newest project since I posted about Catnip earlier this week.  I mentioned before that there are y-seams in this quilt and that all of the instructions are in German.  At first I was sewing my blocks only part way because I wanted to avoid those tricky y-seams.  Now I realize they aren't actually y-seams but partial seams.  It's still scary but I think this will be an amazing chance for me to learn some new skills and really improve on what I already know.  Plus it's being made with some beautiful fabrics so it's easy to look at.


I already made some progress on the learning front because one of the blocks I tackled required partial seams already.  These blocks are far from perfect and I am sure most of you will be able to see pretty easily where my last seam was but over all I am pretty proud of them.  I have no delusions that I would want to make an entire quilt out of blocks that require this kind of seam but a few blocks wasn't so bad.


At the end of the 12 steps there is still a lot of empty space in this quilt I am planning to repeat some of my blocks rather than fill in all of those spaces with little postage stamp size squares but I'm not there yet.  Suggestions are welcome!


Be sure to head over to Lee's and see what everyone else is working on this week.

Saturday, February 16, 2013

Catnip

New projects seem to be like catnip around here.  Like a kid who sees something shiny and gets distracted that has been my feeling lately.  With so many of my quilty friends getting ready to head off to Quiltcon the online community has been pretty quiet.  Typically this week I would be getting ready to go to the Mid Atlantic Quilt Show with my mom but for various reasons we aren't going to make it this year.  I was feeling a little down and out about that so I started surfing around online.  One of my friends told me about the Sew Sew Modern Swap that she had just finished up and how great it was.  I haven't done a swap in a long time but on that particular day was feeling up to the challenge so I went over and signed up-not sure if I made it in yet or not but one of the rules is that you have to post a mosaic before you can join.  So in looking through flickr and picking out favorites to include in my mosaic I came across this quilt.  It stayed in my head for a couple of days and Friday I decided I had to make one of my own.

I had full intentions of using my Marmalade and Vintage Modern for a second Farmer's Wife Quilt.  But I knew it would look perfect with a few other fabrics mixed in for this quilt.  The original directions are in German and google translator helped me navigate the basics but it still doesn't make complete sense so I am following along with the pictures the best I can.  Of course then there is the conversion from centimeters to inches and unfortunately the math didn't transfer right on so I had to make some adjustments there as well.  I'm still not sure it will all turn out right but I'm hopeful.

Right now I have finished the first two steps but I haven't sewn them all together yet.  The original instructions use y-seams to connect the different blocks.  Sine there is a lot of space left after making the 12 steps that you fill in with postage stamp like squares I decided to leave my blocks in pieces until I decide on a final layout just in case I need to move some things around.  I've never sewn y-seams before either so I am trying to avoid them the best I can.